Growing guide
How to grow carrots
Carrots are called an easy crop by people who have not grown them. Nearly everything that decides the harvest happens underground before there is anything to look at, which is why the failures are so consistent and so fixable.
Daucus carota subsp. sativus · Apiaceae, the carrot family, with parsnip, parsley, celery, dill and fennel
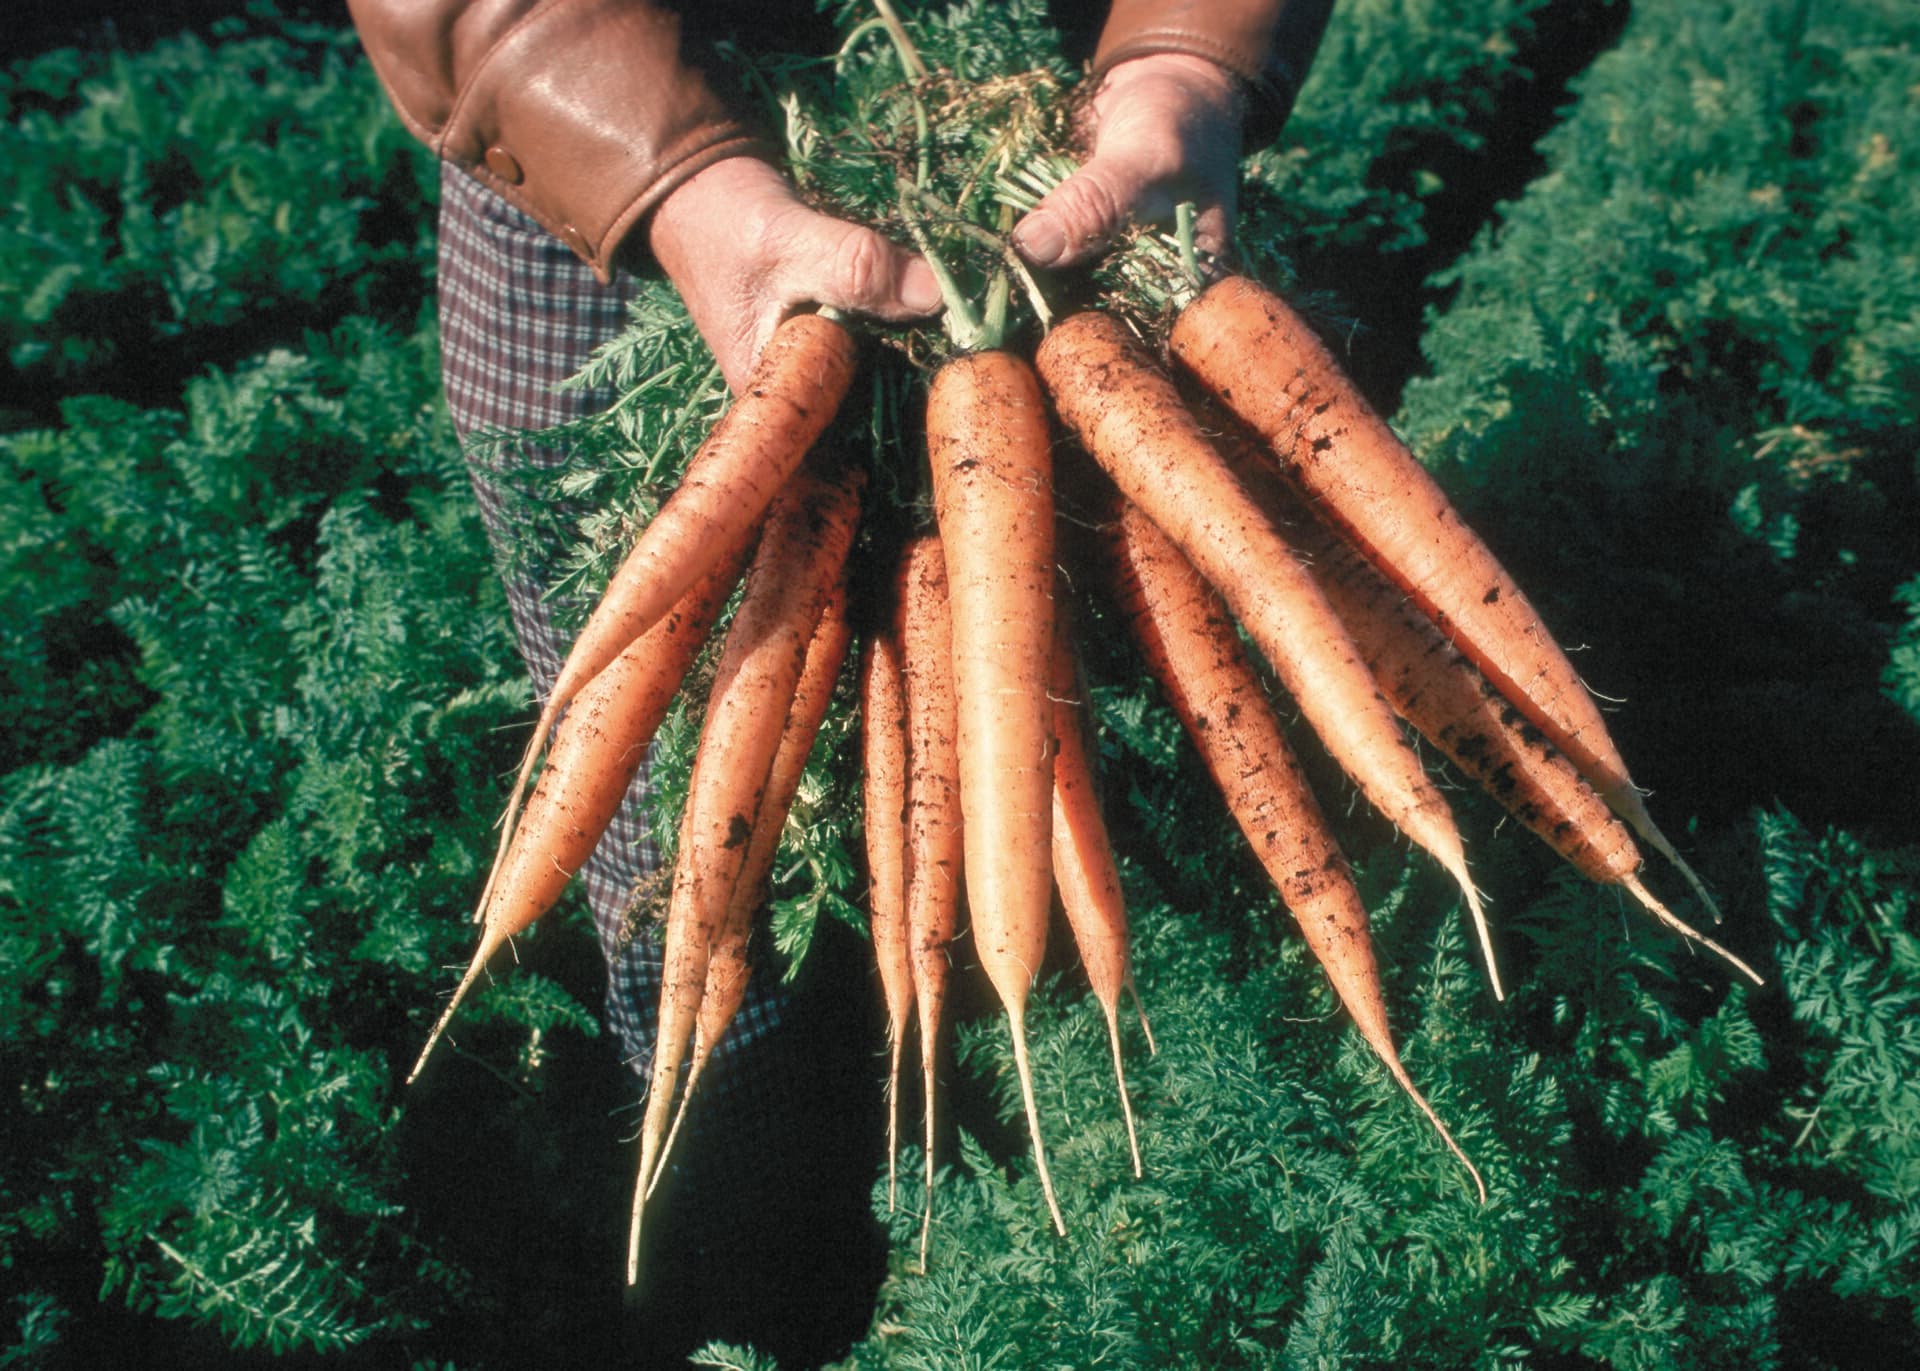
Above: Joe Larson, USDA Natural Resources Conservation Service · Public domain
(NRCS_Photo_Gallery).jpg)
moderate. Easy to grow badly and genuinely hard to grow well. The seed is slow and fussy to germinate, the thinning is unforgiving, and the soil decides the shape of the root before you have any say in it.
At a glance
- Family
- Apiaceae (carrot family)
- Life cycle
- Biennial, grown as an annual
- Hardiness
- Half-hardy, takes frost, improves after it
- Sowing method
- Direct sow only. Does not transplant
- Germination
- 14–21 days, and slower in cold soil
- Soil
- Deep, loose, stone-free. No fresh manure
- Sun
- Full sun; tolerates light afternoon shade
- Days to maturity
- 65–80 from sowing, by variety
- Succession
- Every 3 weeks, spring through midsummer
- Biggest single risk
- Seedbed drying out during germination
When to sow, where you actually live
Every other guide prints a month, and a month is only true somewhere. What transfers between locations is the offset: carrots go in about 2 weeks before the last spring frost, wherever that falls for you. Give us a ZIP and we will count it from your own NOAA weather station.
Current spacing: 2″ apart in rows 14″ apart, sown 0.25″ deep. Roughly 65–80 days to a first picking, though variety moves that more than any general figure admits.
Get your sowing dates →The soil decides the shape before you plant
A carrot is a taproot, and a taproot records everything it hits. A stone, a clod, a hard pan, a lump of undecomposed compost, each one makes the root fork, kink or stop. This is the single reason most home carrots come out ugly, and it is entirely settled before the seed goes in.
What you want is a deep, open, stone-free bed worked to at least the length of the variety you are growing plus a couple of inches. Sandy loam is ideal and heavy clay is the hard case. Do not answer a stony or shallow bed by digging harder, answer it by changing the variety. A stubby Chantenay or a round Paris Market type will make a good root in ground where a long Imperator has no chance at all, and matching the variety to the soil is the most useful decision in this whole guide.
Two things not to do. Do not add fresh manure, nitrogen-rich, partly rotted material is the classic cause of forked and hairy roots, and it is why the old rotations put carrots in the year after a manured crop rather than the year of it. And do not over-feed generally: high nitrogen buys you enormous ferny tops and a disappointing root underneath.
- Stones, clods and fresh manure all cause forking. Deal with them before sowing, not after.
- Shallow or stony ground is a variety problem, not a digging problem, grow a stubby type.
- Follow a manured crop rather than manuring for carrots.
Sowing: shallow, and never in a hurry
Carrots are direct-sown and only direct-sown. The taproot is the crop, and disturbing it is the one thing it does not forgive, so every method that involves moving a seedling, modules, plugs, transplanting a thinning to fill a gap, is wasted effort. If you have read otherwise, it was written by somebody who had not tried it.
Sow shallow. A quarter of an inch is plenty, and there is a clear historical trend towards shallower sowing worth knowing about: Burr in 1863 says drills an inch deep, the 1912 table says a half-inch, and current practice is a quarter. All three are describing the same problem from different sides, the seed is tiny and has very little stored energy, and every extra fraction of an inch is more soil for a thread of a seedling to push through.
The seed is slow. Two to three weeks is normal, and cold soil makes it slower still. Sow thinly and resist the urge to compensate for slow germination by sowing thickly, because a thick row is a thinning problem you have created for yourself.
- Direct sow only, carrots do not transplant.
- Quarter-inch deep. Any deeper is a real cost to a seed this small.
- Expect 14–21 days to emergence, longer in cold ground.
The fortnight that decides the crop
Here is the part almost every short guide skips, and it is the part that actually loses crops. Carrot seed needs the top half-inch of soil to stay damp continuously for the whole two to three weeks it takes to germinate. Not watered daily, damp continuously. Let that top layer dry out once, hard, on a windy afternoon in the middle of the process, and you lose the row. Not some of it. The row.
Worse, a heavy watering or a heavy rain on bare soil can form a crust that a carrot seedling is too weak to break through. So the seedbed has to stay damp without being battered.
The reliable fix is to cover the row. A plank, a length of burlap, a board, cardboard, anything laid directly on the sown row holds moisture and stops crusting. Check under it every day or two from about day ten, and lift it the moment you see the first seedlings, because they will etiolate and die under cover within a couple of days. This is fiddly and it is the difference between a row and no row.
A second old trick that still works: sow a few radish seeds along the row. Radish is up in four days, marks the line so you can weed and water it accurately for the fortnight the carrots are invisible, and is pulled long before it competes.
- Keep the top half-inch damp for the full three weeks. One hard dry-out ends the row.
- Cover the row with a board or burlap, and lift it the day seedlings appear.
- Sow radish along the row as a marker, up in four days, gone before it competes.
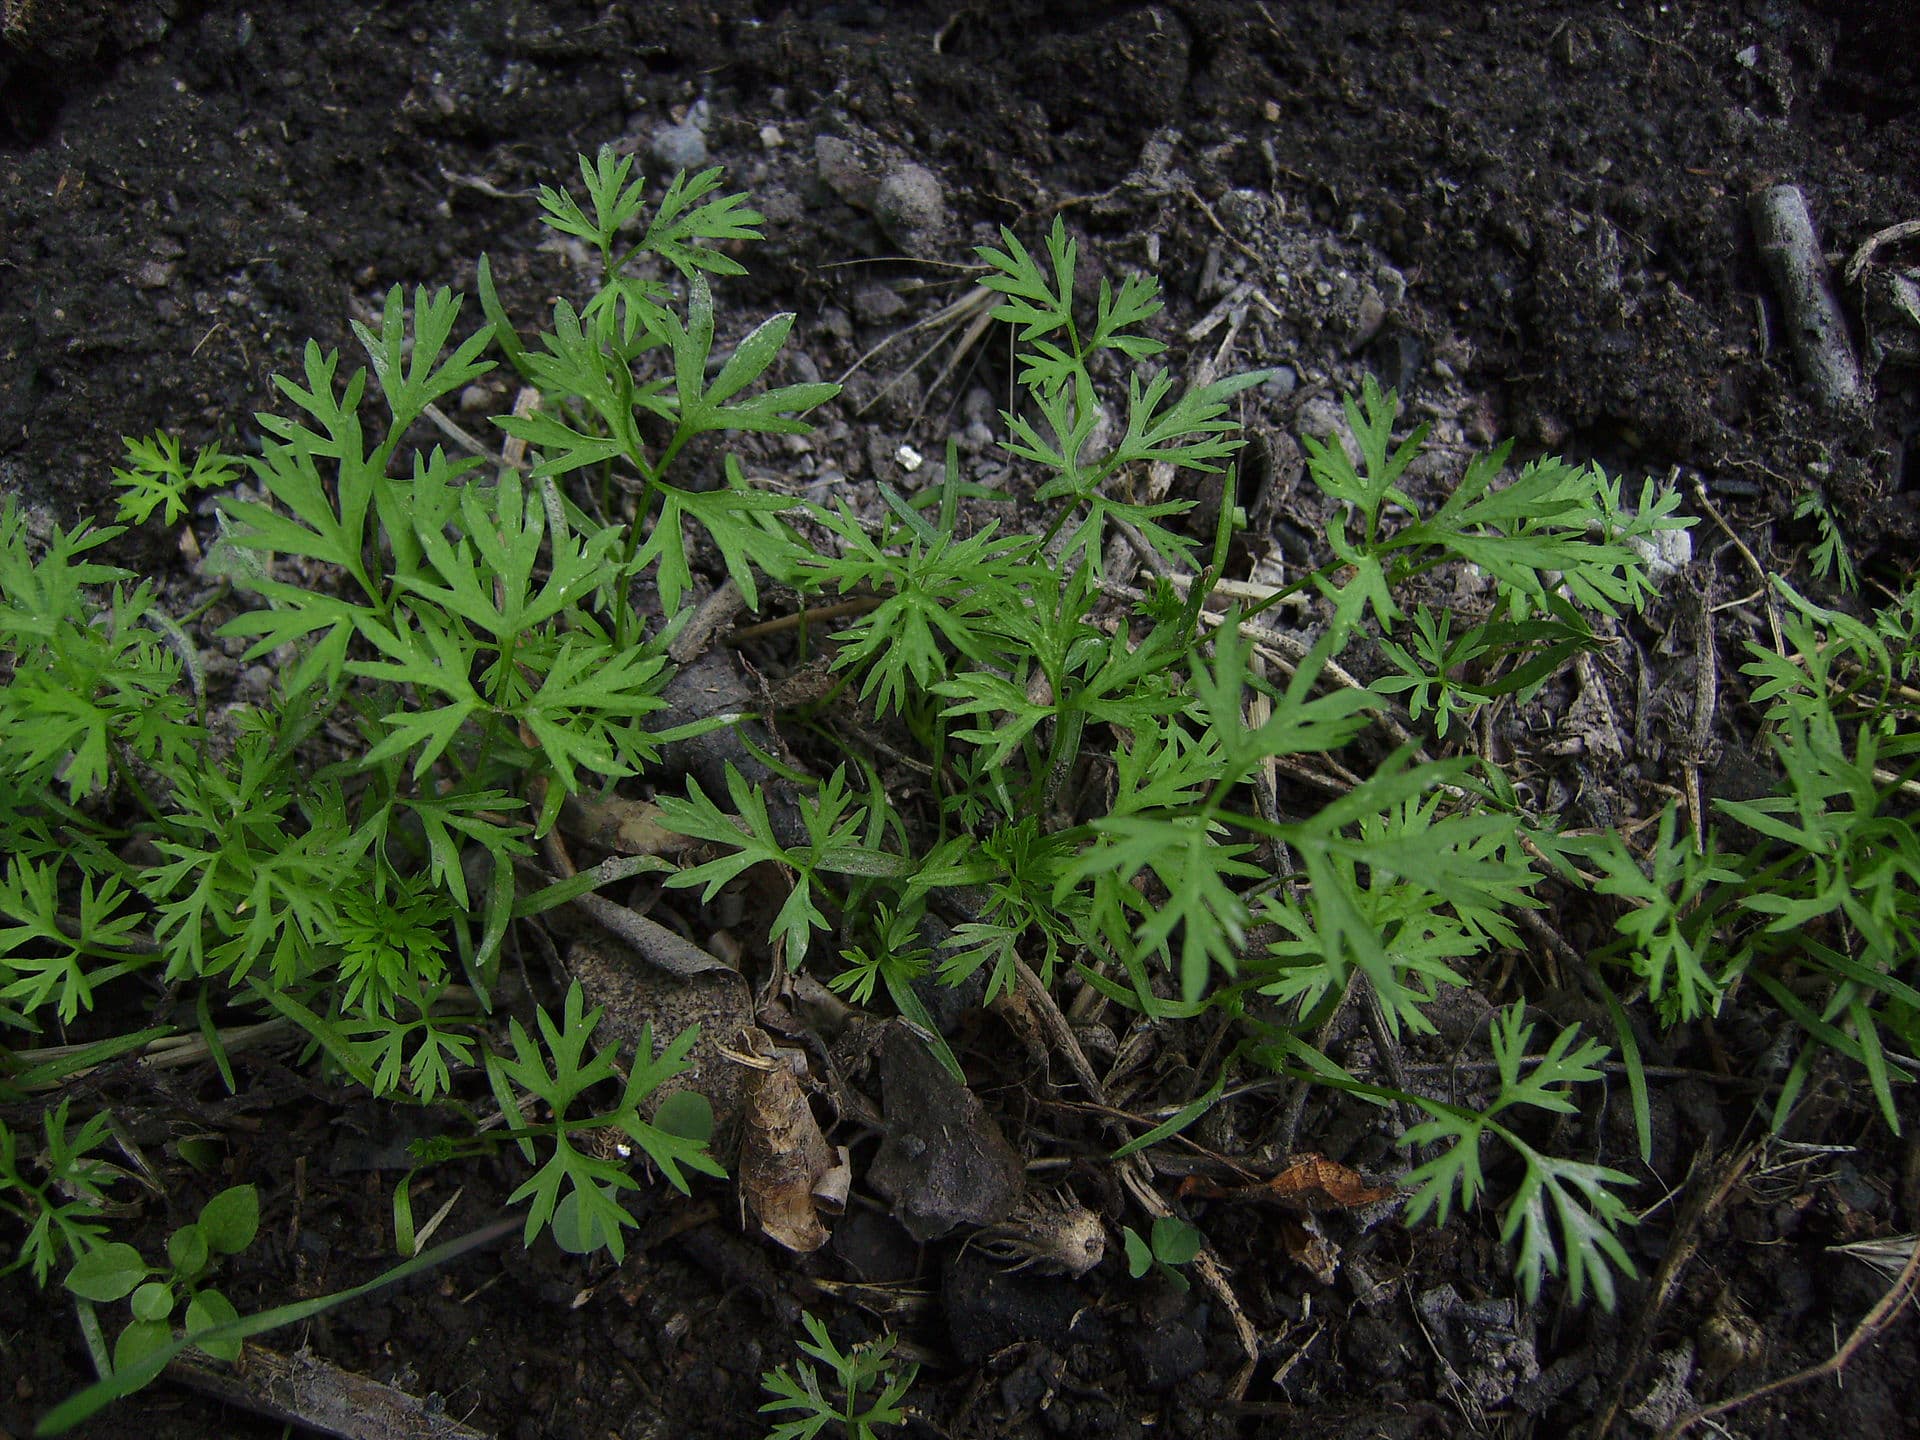
Seedlings that made it through, and now the next problem: this row is far too thick. The first true leaves are already the fine, divided carrot leaf, the two strap-shaped seed leaves that come first look nothing like it, which is why first-time growers weed carrots out by mistake.
Cultivar Nantesa, Castelltallat, Catalonia, 21 August 2011
Victor M. Vicente Selvas · CC0

Thinning is not optional, and the timing matters
An unthinned carrot row produces a mat of foliage and a crop of pale threads. Nothing about later care can recover it. Thin in stages rather than all at once, so that losses to slugs or damping-off do not leave gaps: first to about an inch when the seedlings are a couple of inches tall, then progressively, eating the thinnings, to a final spacing appropriate to the variety and how big you want the roots.
The part most guides leave out: crushed carrot foliage smells, and carrot rust fly finds a row by smell from a considerable distance. Thin in the evening rather than the morning, firm the soil back around the plants you keep, water the row afterwards, and take the thinnings away from the bed rather than dropping them between the rows. Every one of those is a small thing and together they are most of the practical defence against the crop's worst pest.
For what the same job looked like when it was somebody's living: the USDA broadcast a radio script on exactly this in 1943, called Thick and Thin. It is in our archive.
- Thin in stages, eating the thinnings, rather than once and drastically.
- Thin in the evening and remove the thinnings, the smell brings carrot rust fly.
- Firm and water the row after thinning to reseal disturbed soil.
Even water, or split roots
Once established, carrots are more drought-tolerant than they look, the taproot is good at finding water, which is exactly why Solomon can grow them through a rainless Oregon summer at a foot apart with no irrigation at all. What they will not take is a drought followed by a soaking. A root that has slowed down and then suddenly gets water expands faster than its own skin can, and splits lengthways.
So the rule is evenness, not volume. If you are watering, water deeply and regularly rather than lightly and erratically. If you are not watering at all, commit to that from the start and space accordingly, the worst outcome is the accidental middle, where a dry August is broken by one enthusiastic hose.
In the maritime Northwest the practical shape of this is that spring-sown carrots need real attention through July and August, and an autumn crop sown in early summer gets the returning rains at roughly the right moment.
- Splitting is caused by irregular water, not by too much.
- Choose watered or unwatered and stick to it, the erratic middle is the worst case.
Carrot rust fly, and everything else
Carrot rust fly is the pest that matters. The adult lays at the base of the plant, the larvae tunnel into the root leaving rusty-brown scarring, and by the time you see the damage the crop is what it is. It is a serious problem west of the Cascades and in coastal climates generally.
Three defences actually work. Physical exclusion is the most reliable: floating row cover or fine insect mesh, sealed at the edges from the day of sowing, on ground that did not grow carrots or parsnips last year. A barrier fence of fine mesh two to three feet high also helps, because the fly characteristically flies low. And timing helps, the fly has distinct generations, so sowings placed between them are hit less, though the exact windows are local enough that your county extension service is a better source than any national guide, including this one.
Beyond that: aphids on the foliage in warm spells, generally tolerable; wireworm in ground recently turned from grass, which is a reason not to put your first carrots in a newly broken lawn; and slugs, which take seedlings rather than roots. On the disease side, Alternaria leaf blight in wet seasons, and cavity spot in heavy wet soils, both are much reduced by rotation and by not growing carrots in the same bed two years running.
The wartime guidance on all of this is a good illustration of what has and has not changed. Every mechanical and cultural control the USDA recommended in 1944 is still recommended; almost every chemical it named has since been withdrawn.
Sources
- Row cover or fine mesh from the day of sowing is the one reliable defence.
- Rotate, do not follow carrots or parsnips with carrots.
- Avoid newly broken sod for a first carrot bed; wireworm lives there.
Harvest, and why frost makes them sweeter
Start pulling as soon as roots are worth eating, there is no reason to wait for a size on a packet. Loosen alongside with a fork rather than hauling on the tops, which snap off and leave the root in the ground. If the soil is dry and hard, water the row an hour beforehand and they will come out whole.
Carrots left in the ground through frost get sweeter, and this is real rather than folklore: cold triggers the plant to convert stored starch into sugars, which work as antifreeze in the root. The 1912 manual states the same effect for kale as common knowledge without knowing the mechanism.
In a mild maritime winter you can simply leave the crop in the ground under a deep mulch of straw or leaves and dig as needed, which is the least work and the best eating. Where the ground freezes hard, lift before it does.
- Loosen with a fork; do not pull by the tops.
- Frost genuinely improves flavour, starch converts to sugar.
- In a mild winter, mulch deeply and leave them in the ground.
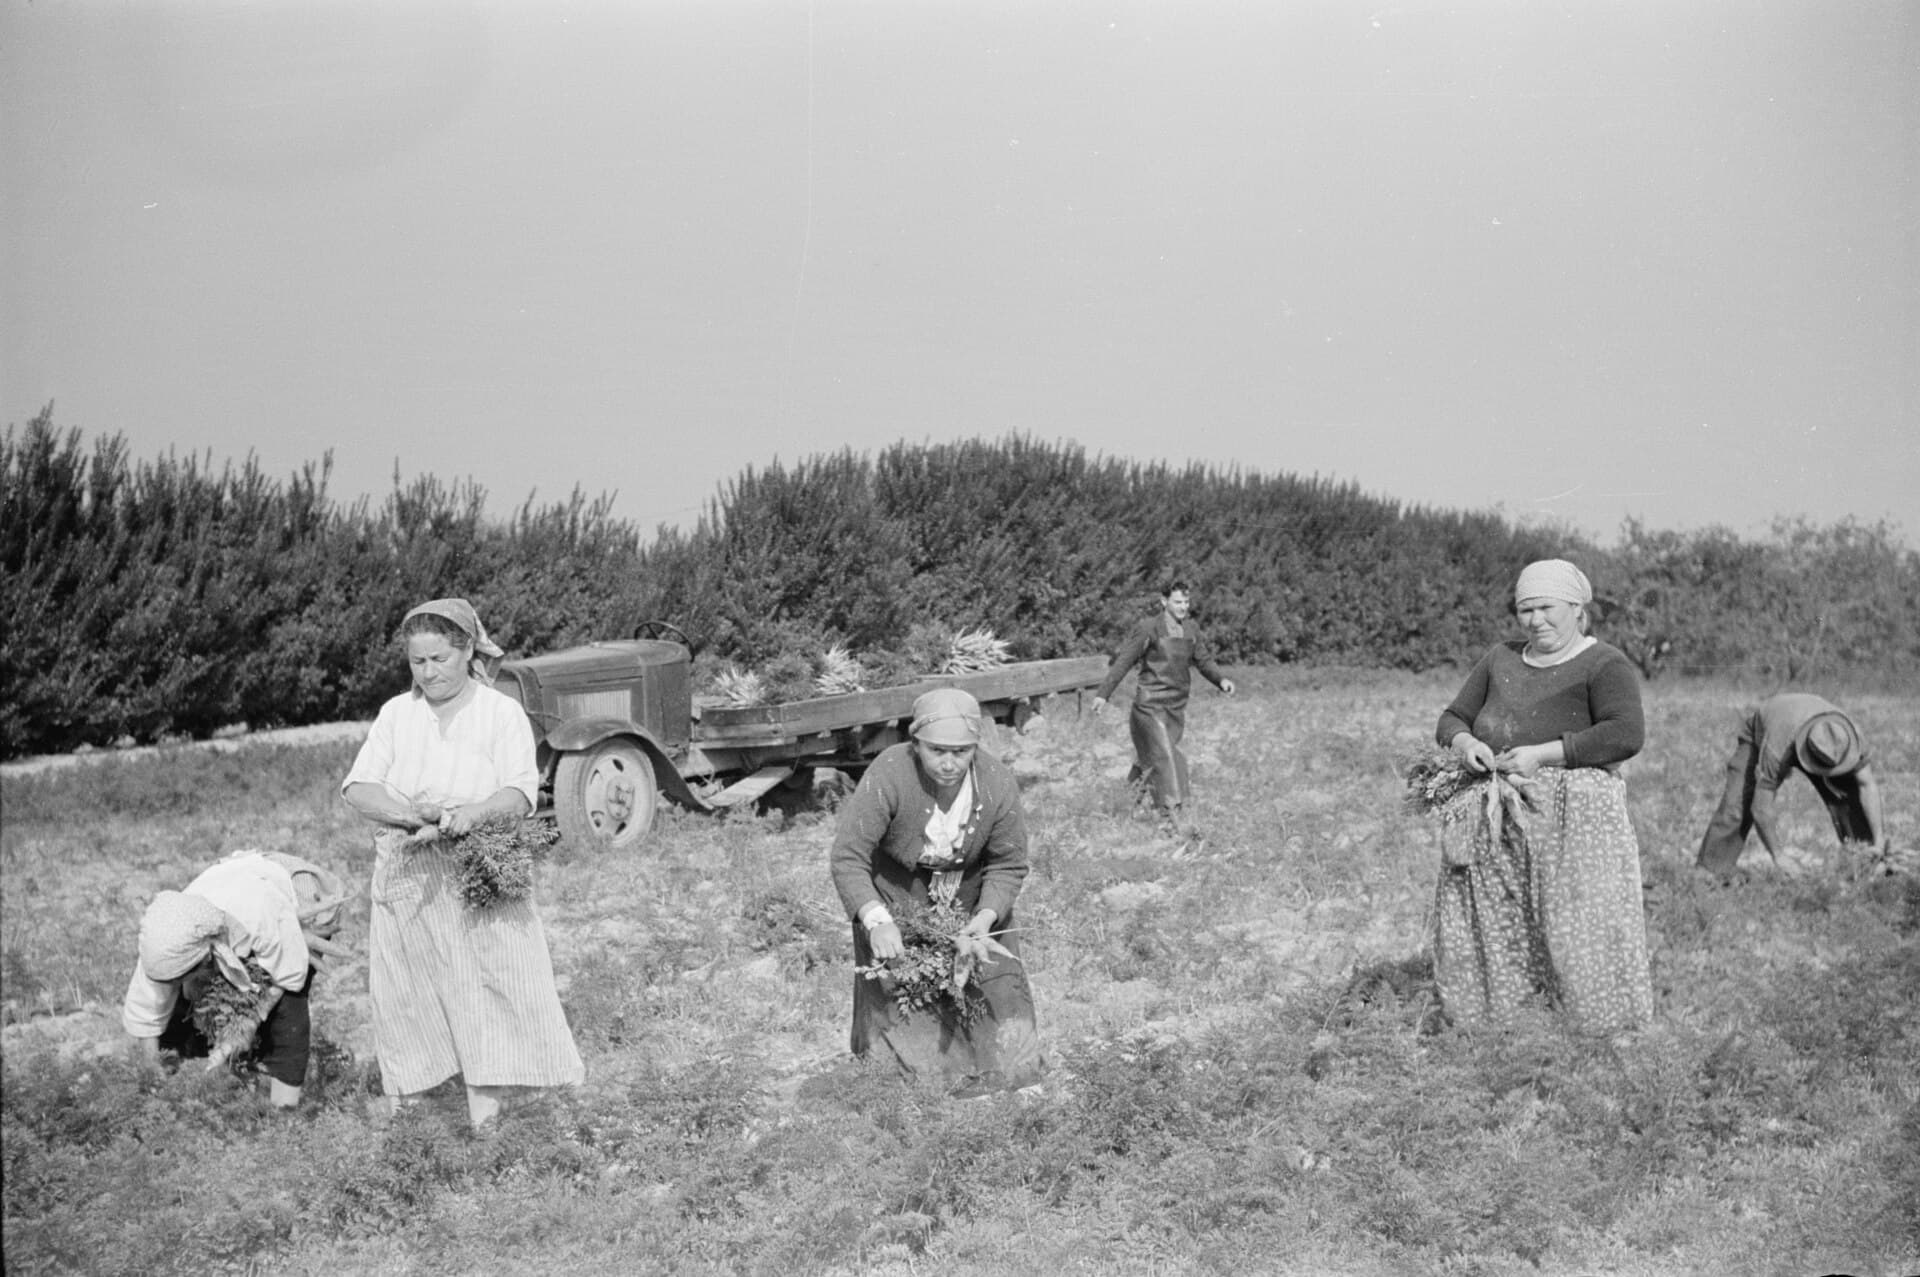
Carrot harvest on a Camden County truck farm, October 1938, photographed for the Farm Security Administration. Pulled, bunched by the tops, and loaded loose, the same sequence a home grower still follows, at a different scale.
Camden County, New Jersey, October 1938. The caption records that the women travelled from the Italian section of Philadelphia to work the truck farms.
Arthur Rothstein, Farm Security Administration · Public domain

Storage: tops off immediately
Cut the tops off within an hour of lifting. Leaves left on keep drawing moisture out of the root and a bunch left topped overnight is noticeably limper by morning. This is the single most common storage mistake and it costs nothing to avoid.
For keeping: layer the roots in barely damp sand, sawdust or leaves in a box somewhere cold and dark, not touching each other. Just above freezing with high humidity is the target. Burr describes exactly this in 1863, the finer sorts packed in earth or sand to hold their freshness and flavour, and reckons on them keeping until May or June. That is still about right.
In the fridge, unwashed and in a sealed bag, expect several weeks. Washing before storage cuts that sharply, so wash as you use them.
- Top them immediately. The leaves keep transpiring after lifting.
- Damp sand, cold and dark, roots not touching, good until spring.
- Wash at point of use, never before storage.
How this crop used to be spaced
A single spacing figure reads as a fact about the plant. It is not, it is a judgement about your cultivation method and your water, and two books on our shelf disagree with our figure and with each other for reasons worth knowing.
- 1912, worked by hand
- Rows 18 to 24 in., plants 6 or 7 to ft., sown 1/2 in.deep. That is the hand-cultivation column, the same table's horse column is far wider, because a horse and cultivator had to walk between the rows, and quoting that one is how old manuals got their reputation for wasting ground. We reproduce the table in full.
- Through a rainless summer, unwatered
- Final thinning to 1 foot apart, allocating 4 feet of width to a single row. Six times the room our figure gives each root, and Solomon is honest about the cost: dry-gardened carrots are not as tender as heavily watered Nantes types. They are also still there in a summer that would have taken the row out. Our notes on the book.
Which type to grow
Grouped by what each is for rather than by catalogue order, because the useful question is which one suits your ground.
Nantes
Cylindrical, blunt-tipped, 6–7 inchesBest for: Good loose soil, and eating raw
The sweet, tender, thin-skinned type most people mean by a good carrot. Wants decent depth and does not tolerate stony ground. Solomon warns that dry-gardened roots will not be as tender as a well-watered Nantes, that comparison is the standard he is measuring against.
Chantenay
Broad-shouldered, tapering, 5–6 inchesBest for: Heavy, shallow or stony soil
The answer to difficult ground, and the variety a frustrated grower should try before giving up. Stores well and stands longer in the ground. Named in the 1912 manual as an excellent table carrot, which is a reasonable indication of how long it has been doing this job.
Danvers
Conical, strong-shouldered, 6–8 inchesBest for: Heavier soil, storage and cooking
The American storage standard, tougher and more forgiving than Nantes, coarser in texture. If you want one variety to fill a box of sand for winter, this is the safe choice.
Imperator
Long, slim, tapered, 8–10 inchesBest for: Deep sandy loam only
The supermarket shape, bred for machine harvest in deep light soil. In a typical garden bed it is the most likely of all types to fork or stunt. Grow it if your soil genuinely suits it and not because it looks like what you buy.
Paris Market / round carrots
Round, 1–2 inches acrossBest for: Containers, shallow beds, heavy clay
Under-used and the correct answer to a container or a bed you cannot dig deeply. They mature fast and dodge the whole forking problem by not being long enough to hit anything.
Purple, yellow and white carrots
Varies by cultivarBest for: Interest, and a link back to what carrots used to be
Orange is a relatively recent standard. Burr's 1863 catalogue is full of white, yellow and blood-red sorts, several of them field crops for stock. Modern coloured varieties are not those varieties, but they make the point that the orange carrot is a choice rather than a fact.
What went wrong
Listed by what you can see, not by what the plant has, you arrive here holding the evidence and without the vocabulary. Where the answer is that nothing can be done this year, it says so.
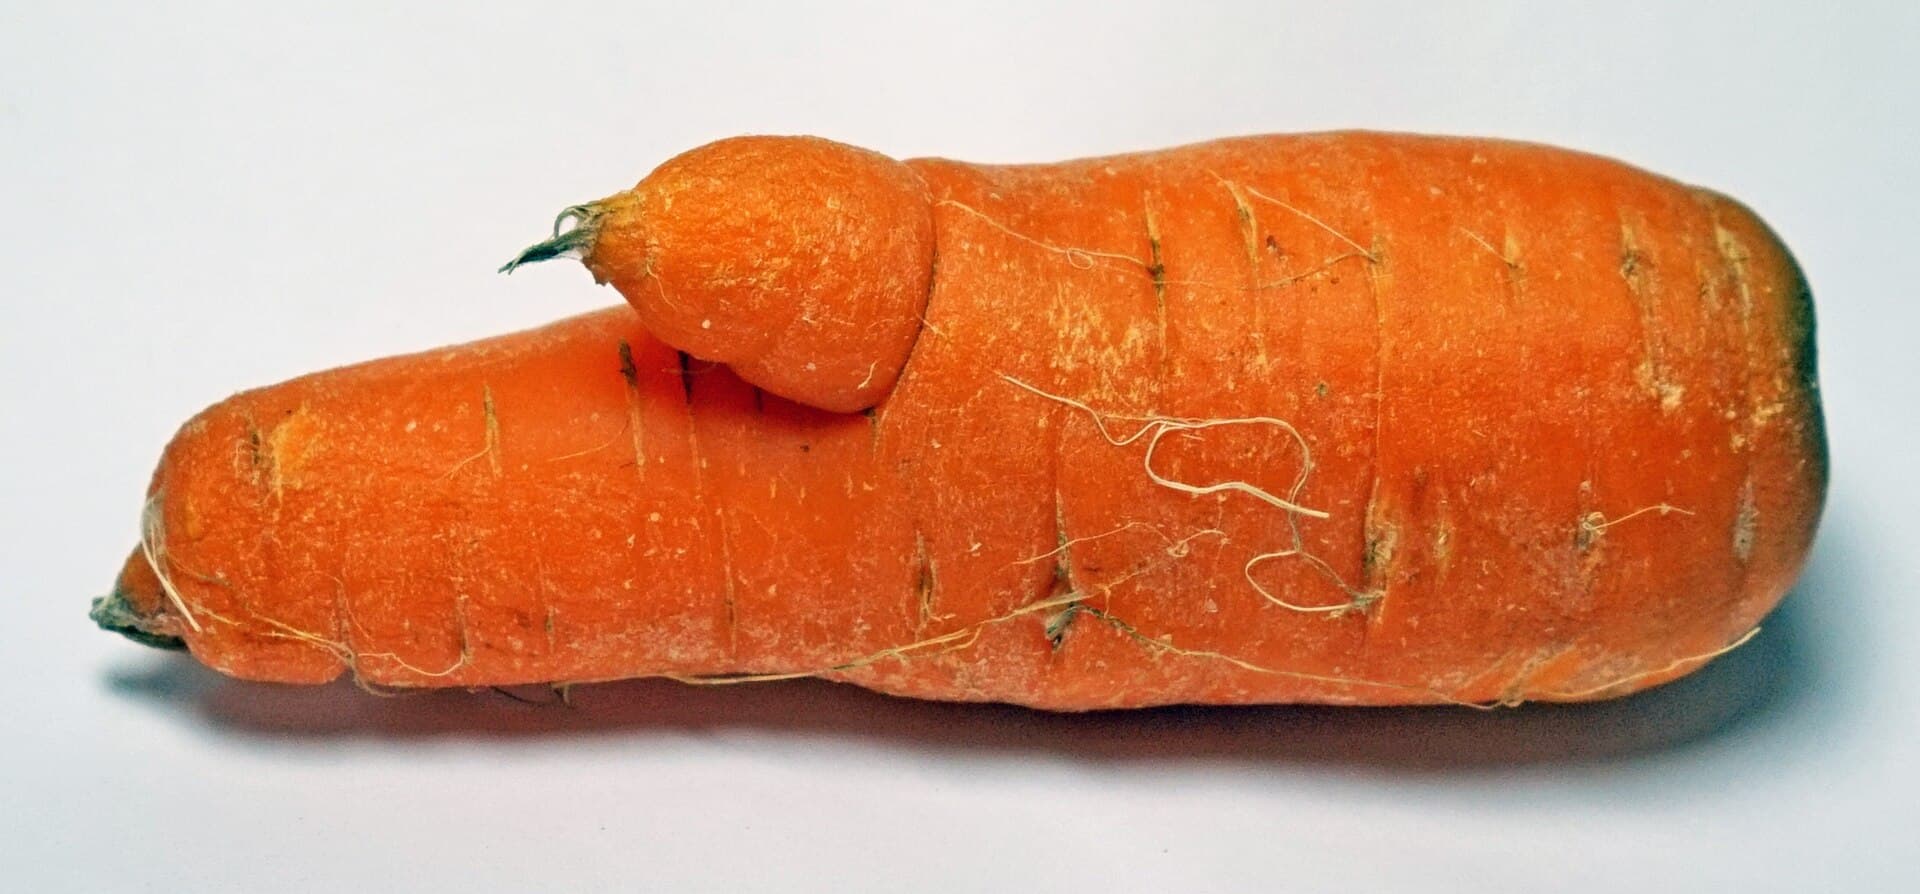
The commonest carrot failure, and a useful one to be able to recognise. The taproot hit something, stopped, and put out a second growing point beside it. Nothing about watering or feeding caused this, it was decided by the seedbed before the seed went in.
Photographed 13 June 2015
Tiia Monto · CC BY-SA 3.0

Roots fork into two or three legs
Next seasonWhy: The taproot hit a stone, a clod, a hard pan or a lump of undecomposed material and split around it. Fresh manure is the other classic cause.
What to do: Nothing this year, the shape is already set. Next time, work the bed deeper and stone-free, skip the fresh manure, or switch to a Chantenay or round type that does not need the depth.
Roots covered in fine hairy rootlets
Next seasonWhy: Too much nitrogen, usually from fresh manure or a heavy feed, sometimes from waterlogging.
What to do: Still edible; scrub and use. Grow the next crop in ground manured for a previous crop rather than for this one, and improve drainage if the bed sits wet.
Roots split lengthways
Fixable nowWhy: Irregular water. A root that slowed in drought and then got a soaking grows faster than its skin can stretch.
What to do: Use split roots promptly, they do not store. Even out watering for the rest of the season, and mulch to buffer the swings.
Rusty brown tunnels in the root, foliage bronzed
Next seasonWhy: Carrot rust fly larvae.
What to do: Cut out damage and use what is sound; badly tunnelled roots will not store. Next season, cover from the day of sowing with fine mesh, rotate away from where carrots or parsnips grew, and thin only in the evening with thinnings removed.
Green or purple shoulders on the top of the root
Fixable nowWhy: The crown was exposed to light. Cosmetic and mildly bitter, not a disease.
What to do: Draw soil up over the shoulders as the roots swell, or mulch the row. Cut the green off before cooking.
Enormous ferny tops, small or no root
Fixable nowWhy: Too much nitrogen, too little sun, or a row that was never thinned.
What to do: Thin now if it has not been done, it is late but not useless. Next time, feed less, thin on time, and give the row full sun.
Almost nothing came up
Fixable nowWhy: Nearly always the seedbed dried out during the two- to three-week germination, or a crust formed after heavy watering. Old seed is the second cause.
What to do: Re-sow, this time with a board or burlap over the row and a daily check from day ten. Carrot seed is short-lived, Burr reckoned on two good years and a partial third, so use fresh seed and test old seed on a damp saucer first.
Plants bolt and send up a flower stalk
Fixable nowWhy: Carrots are biennial and flower in their second year, but a cold spell after sowing can trick a first-year plant into treating it as a winter.
What to do: Pull bolted plants; the root goes woody and will not recover. Sow into warmer soil, or use a bolt-resistant variety for the earliest sowing.
16 kinds, in 1863
Every carrot Fearing Burr describes in 1863, counted from the chapter headings rather than estimated. Several, the Belgians, Long White, Long Yellow, were field carrots grown for stock rather than the table, and Burr treats feeding them to horses and dairy cows as an ordinary use. We have not yet checked these names against what seed houses sell today, so we are not putting a number on what was lost.
Altringham · Early Frame · Early Half-long Scarlet · Early Horn · Flander's Large Pale Scarlet · Long Orange · Long Red Belgian · Long Yellow · Long Surrey · Long White · New Intermediate · Purple or Blood Red · Short White · Studley · White Belgian · White Belgian Horn
Our reading of twenty-two tomatoes →What’s in carrots
Per 100 grams raw, from USDA FoodData Central. The range is what USDA actually measured across its samples — it is usually wide, and your own crop sits somewhere in it rather than on the headline number.
| Nutrient | Per 100 g | % daily | Range measured |
|---|---|---|---|
| Fibre | 3.095 g | 11% | 2.74–3.37 (n=8) |
| Folate | 37.06 µg | 9% | 27.7–53.4 (n=8) |
| Potassium | 279.6 mg | 6% | 144–358 (n=8) |
| Magnesium | 12.45 mg | 3% | 9.08–19.8 (n=8) |
| Calcium | 30.48 mg | 2% | 25.3–34 (n=8) |
| Protein | 0.94125 g | 2% | 0.6875–1.25 |
| Iron | 0.1504 mg | 1% | 0–0.4775 (n=8) |
| Water | 87.72 g | , | 85.18–88.95 (n=8) |
Source: USDA FoodData Central, “Carrots, mature, raw” (Foundation, published 4/28/2022). Percentages are of the FDA adult Daily Value, a labelling reference rather than a personal requirement. Raw values; boiling leaches water-soluble vitamins and some carotene, so a cooked serving is not the same figure.
What the wartime archive says about carrots
9 passages from the USDA’s 1943–46 victory garden material, with our note on whether each still holds. Pulled from the annotations themselves rather than listed here by hand.
- The best soil for carrotsStill holds
The garden specialists say carrots produce misshapen roots, and don't yield well, in soil that's wet, clayey, heavy, stony or trashy... If your soil tends to form a crust at the surface, start the carrots by covering the seeds only about on…
The Question Box · April 18, 1944
- Parsnips want the frostStill holds
I hope this new gardener has some parsnips for she can leave these right in the garden row. Some of our old-time gardeners wouldn't tolerate using parsnips until they had had a few weeks of cold weather.
The Question Box · August 31, 1944
- The Department says don't save seedMostly holds
Unfortunately, no. Horticulturists of the Department of Agriculture say it might be a good plan if it would work — but it won't, especially for those vegetables you named: carrots, beets, cabbage, kale, onions and turnips. Those vegetables,…
The Question Box · August 5, 1943
- Knowing when you cannot winStill holds
No means of control on the growing crop is known, as any soil treatment sufficient to kill the worms will injure the plants. … Avoid planting carrots, onions, and other root crops on soil known to be infested.
Victory Garden Insect Guide
- Eat what you pullStill holds
You can often use the thinnings of greens like chard and beets. The young leaves you pull out are delicious to eat. Use the first thinnings of beets as greens, later thinnings as baby beets cooked with greens... Tiny-finger carrots are fine…
Working the garden year · May 10, 1943
- Spade in the autumnStill holds
Many Victory Gardens will be planted on land that was in grass or weeds the year before, and such soil is likely to be infested with cutworms, white grubs, and wireworms. Where possible, therefore, spade or plow the ground during the fall o…
Pests and diseases · “Insect Control in the Victory Garden”, 1943
- A row cover, in 1943Still holds
Small seedlings may be protected from insects by covering them with an inverted glass jar or by completely covering them with a light paper or muslin hood. Such hoods are usually about 8 inches in diameter and are supported by wire or woode…
Pests and diseases · “Insect Control in the Victory Garden”, 1943
- Storing roots without a root cellarMostly holds
People who have only a few pecks, or bushels, can put them in bushel baskets, lined with old newspapers, and they'll keep for several weeks. In the garage, in a corner of the back porch, or in the basement. However, if you store root crops…
Saving the crop · October 4, 1944
- Cut the tops off flushMostly holds
In preparing these vegetables for storage — beets, carrots, turnips and rutabagas — cut the tops off flush with the top of the roots.
Saving the crop · October 4, 1944
Saving your own seed
Carrots are biennial: they make the root in year one and the seed in year two, so seed saving means keeping roots through a winter and replanting them.
Burr's method still works. Select good-sized, smooth, symmetrical roots, and as soon as the frost is out of the ground replant them three feet apart with the crowns just below the surface. The seed stalks reach four to six feet, flower in June and July, and ripen in August, but not all at once, so cut the heads as they mature rather than waiting for the plant.
The seed is covered in stiff bristles that make it clump. Rub them off between your hands before sowing, which is exactly what Burr describes, and the seed will run evenly in a drill.
The catch is isolation. Cultivated carrot crosses freely with wild carrot, Queen Anne's lace, which grows on roadsides across most of this country, and the cross is invisible until you grow out the next generation and find white, woody roots. Serious seed saving needs real separation or physical isolation, which is why most home growers buy carrot seed and save something easier.
Farm rooted clothing · Est. 2005
The guides are free. The shop is the business.
Sun & Rain Works is a small apparel outfit in Eugene, Oregon, with agricultural roots and a slow path toward farming. The carrots guide you just read comes from the same place as the shirts.
More growing guides
We're working through the vegetables one at a time, with dates counted from your own frost station and the old books read properly. Occasional notes from Eugene, Oregon, an art business with agricultural roots, working its way toward farming.
We'll email you to confirm before sending anything. After that, occasional seasonal notes from Sun & Rain Works, we won't share your address, and every email has an unsubscribe link.
Growing advice here is current horticultural practice, drafted with AI assistance and checked against the sources this page names. Where it quotes a book, the book is named and linked. Where practice is genuinely contested, or local enough that we would be guessing, the text says so, your county extension service beats any national guide, including this one, on pest timing.
The photographs are not AI-generated. Every one is our own work, public domain, or licensed, and carries its author and licence beneath it.